Drag-and-drop page builders are powerful tools.
They gave regular WordPress users the opportunity to create pages and layouts, similar to what only experienced web designers were able to do a decade ago.
The process of web designing is becoming more user-friendly every year and WordPress is the best platform for non-tech-savvy users.
What you’ll find in this article:
- Why having a page builder plugin is necessary
- The difference between the plugins interfaces
- The actual process of designing a section with a page builder
- The available elements for both plugins
The web is changing quickly and webmasters want a flexible environment to change their websites with a similar phase.
Having a website is no longer a “set it and forget it” thing, another contact channel just to fill in the info on your business card.
Today most of the themes on the market come with some kind of visual page builder. This is giving the owners the opportunity to easily manage the look of their websites and update things quickly when needed, without hiring a professional.
Why do you Need a Page Builder?
Let’s take a look at one of the most popular themes on the market – The Genesis Framework themes.
The Genesis Framework is valued for its clean code, speed, security and SEO friendliness.
The themes are stylish, clean, and completely inflexible.
If you take a look at any Genesis Framework child theme, you’ll see the same issues with all of the themes – they are predefined!
For example, You can love the Essence Pro when you first see the theme demo. Let’s say you decide that this is your theme and you buy it.
What you’ll probably find out later, except for the complicated setup to make it look like the demo, is that you have absolutely no control over your layouts. You are given a few widgets and that’s it!
For Genesis Framework, even simple tasks like adding a search to your header, or changing the colors of your site are made so complicated and frustrating even for experienced users.
If you want to feature a new section on your homepage, list new services, or anything else, you will be stuck.
And that’s the reality with most of the predefined “section ready” themes.
[one_half]
[box title=”” bg_color=”#1274a8″ align=”left” text_color=”#ffffff”]
![]()
WPBakery Page Builder
[button href=”https://wpctrl.com/click/wpbakery-page-builder/” style=”flat” size=”medium” color=”#61ce70″ hovercolor=”#57bab8″ textcolor=”#ffffff” target=”_blank”]More info[/button]
[/box]
[/one_half]
[one_half_last]
[box title=”” bg_color=”#F2295B” align=”left” text_color=”#ffffff”]
![]()
Elementor Pro
[button href=”https://be.elementor.com/visit/?bta=3021&brand=elementor” style=”flat” size=”medium” color=”#61ce70″ hovercolor=”#F26F8E” textcolor=”#ffffff” target=”_blank”]More info[/button]
[/box]
[/one_half_last]
Elementor has a FREE version. You can create the hero section and some more basic designs, but you won’t have access to the premium widgets and elements.
Now let’s get into it. I’ll make one of the most used section that almost every website or landing page have – the hero section, with both Elementary and WPBakery Page Builder.
Hero Section with WPBakery Page Builder
This is what your visitors see first, so you better grab their attention with clear messages and design.
How to create a hero section with WPBakery Page Builder?
- Make sure you have disabled any sidebars and preferably choose a full-width layout if you have the option in your page/theme settings.
- Switch to “Backend editor” (this will enable the page builder instead of the classic text editor) then click the “Add Element” button. Choose “Row”.
Note: You can also use the frontend editor of WPBakery Page Builder, but I find it easier to work in the backend.
Add an empty row first
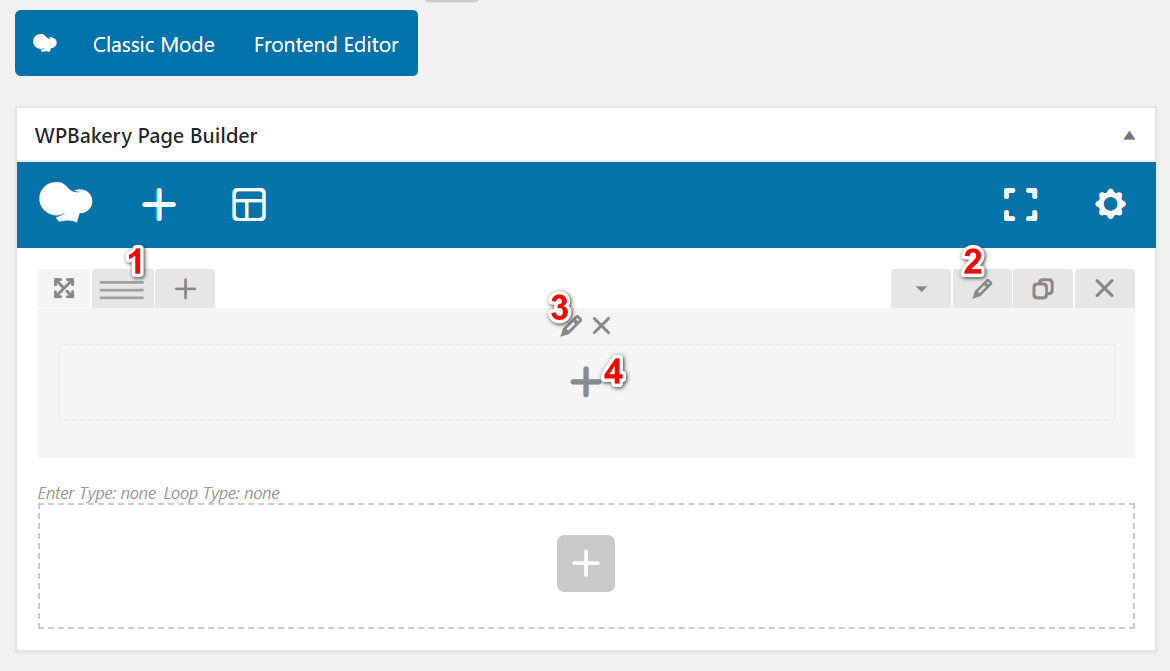
- The row columns’ layout
- Row settings – from here you set the background, width, setting margins and padding, and more.
- This is the style of the column
- From here you add your elements (content)
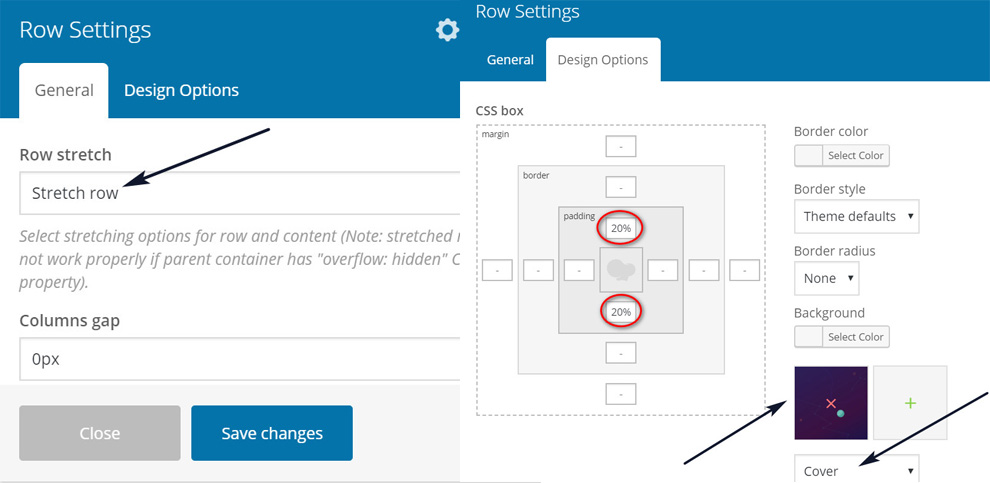
The hero section needs a background image. Head to the row settings (2). On the ‘General’ tab set the row stretch to ‘Stretch row’, this will make your row full width.
Then go to the ‘Design options’ tab.
Here you can choose your hero image and set the row paddings, this is necessary in order to get enough space around your elements.
In the drop-down menu, below the thumbnail, set the option to ‘Cover’.
Note: You can play with the paddings to get the desired height of your row. I choose percentages, but you can use px, em, or rem values.
Click Save changes.
Note: Later when I added the headings I changed the top padding to 10%.
[alert-note]The default background options of WPBakery Page Builder are very limited. You can add overlays, parallax effects, gradients and more with any of these additional add-ons.[/alert-note]
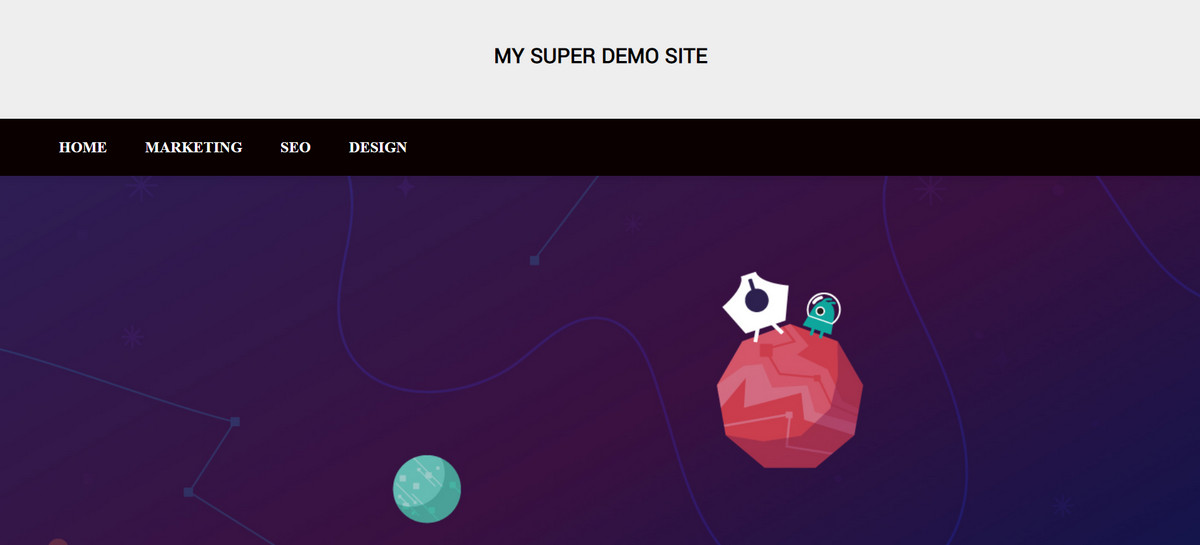
What you should get is an excellent full-width section ready for some extra elements.
Adding text and a Call-to-Action button
WPBakery Page Builder comes with its own Custom Heading element.

For this example, we’ll use two custom heading elements, the second will play the role of a subheading.
Choose your desired font, size, color and align them in the element’s settings screen.
Clone the element for the subheading and just change the text and the size to a smaller one.
Click the small plus sign below your element to add a CTA.

Select the ‘Button’ element and select your preferred settings (size, color, URL etc.). Remember to add some padding to give your CTA space to breathe – go to the ‘Design options’ tab of your button and add 15px top padding!
…and voila!
Our Hero Section is ready to get some clicks.

Hero Section with Elementor Pro
Let’s try the same example but this time using Elementor Pro.
The main difference is that Elementor is a frontend page builder only, the moment you click the ‘Edit with Elementor’ Button you will be redirected from your backend.
Both page builders have very different interfaces and approaches to design.
First things first, you want to get rid of any sidebar you might have and hide the page title.
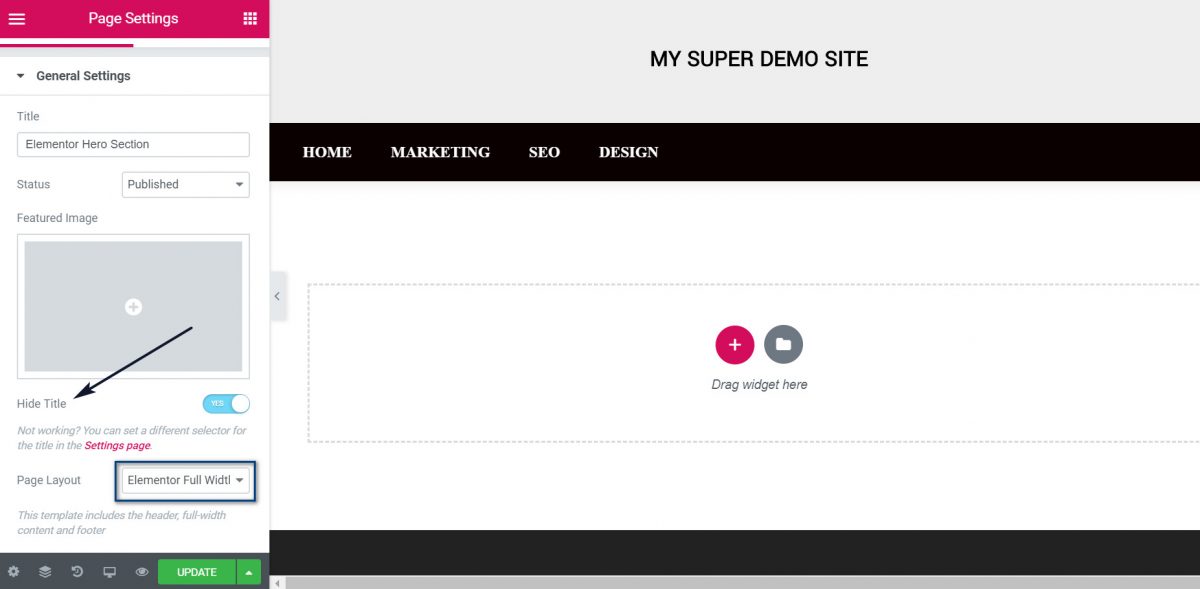
Then click the purple plus icon to add a new section. Before we add the image and the heading, there is some work to be done in the row settings.
When you hover over the section, three small icons appear at the top left corner. Click the middle one (the 6 dots) and the settings panel will appear on the left side.
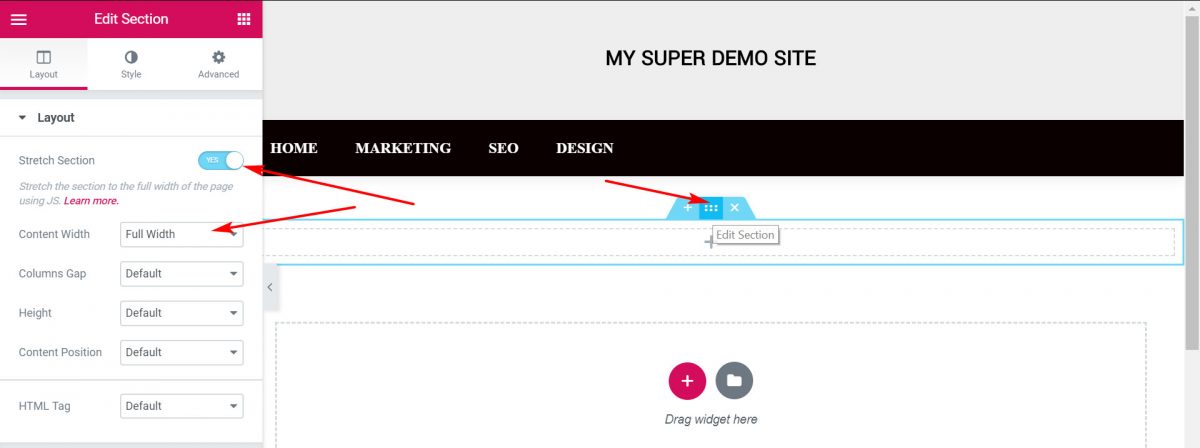
To get a nice full-width section turn on the Stretch section option and from the Content width drop-down choose Full Width.
In the Style tab, you can set your font colour, alignment and more.
Hover again and another small icon will appear at the top left corner, that is where we’ll place our image and set the paddings.
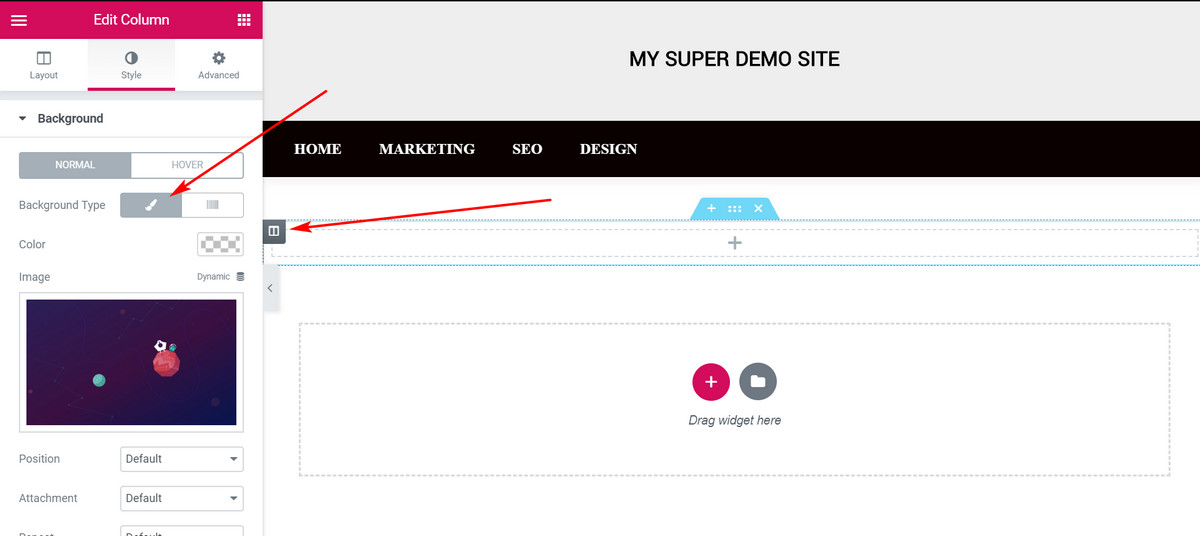
Note that your background won’t appear until you add your an element.
Click the plus icon and drag the Heading widget to your section. Then again drag another heading for the subheading and finally drag a button below the two.
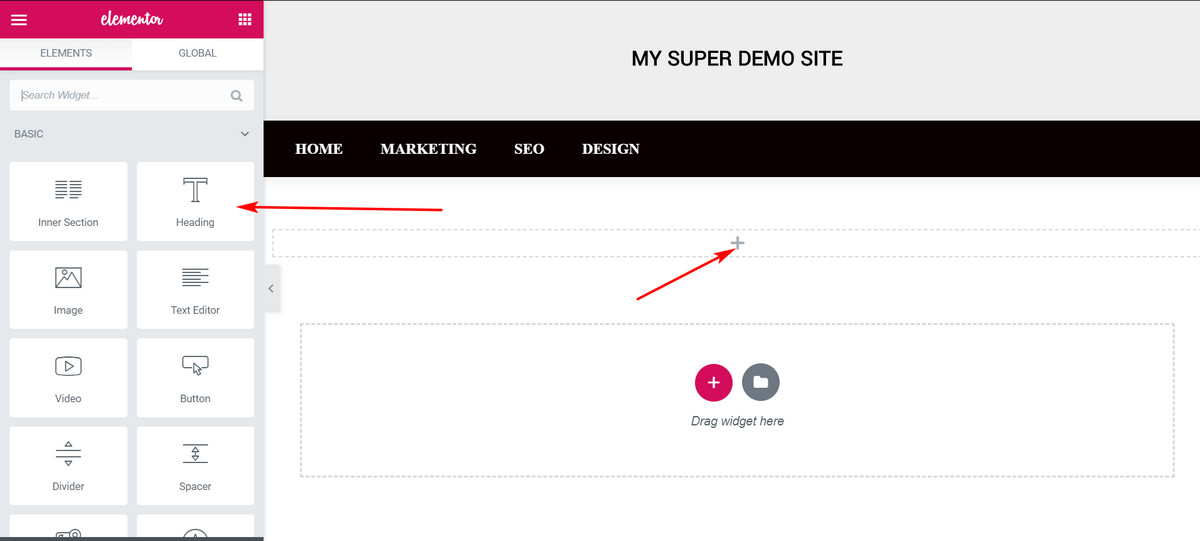
Click update and your hero section is ready.
Here is the final result.

Elementor or WP Bakery Page Builder?
If you want a front end drag-and-drop page builder – Elementor is the better choice. It has also a free version, which might be totally enough for some users. It’s also more intuitive and easier to get used to. If you want to get creative, I think WP Bakery is the one you should get. Combined with some of the premium addons on the market it becomes a powerful tool to create almost anything.
Disclosure: Some of the links on the page may contain a ref code (affiliate links), that tells the other side that we have sent you. If you liked what we suggest and you make a purchase, we may receive a commission.