
Recently I noticed all of my automatic translations by Tansposh are no longer available.
This happened a few months ago, and it seems that Transposh is not compatible with WordPress 5.8 version.
At first, I thought there is something wrong with my site, but then I checked other sites I host and all had the same problem.
I tried to search the support threads and write to the support myself, but there are no answers yet.
What exactly was the Issue with Transposh Translations?
Since WordPress 5.8 (maybe even earlier), the translated versions of the pages were showing the original text in English.
In other words, Transposh stopped working.
For example /de/post-title or /es/post-title were all in English now.
This of course created a huge SEO problem, and before I realize what was happening my organic traffic went down.

The worst part is both the original article and the translated ones dropped in the SERPs, because of the duplicated content and language discrepancy.
What I did to Recover my pages
After some research and testing, I came to the decision to try Polylang.
Polylang is a free translation plugin for human translation only, but combined with another free plugin – Lingotek you can add automated machine translations easily.
My ultimate goal was to get the exact same page format, which was previously generated by Transposh – site.com/language code/post-name
Before you start with Polylang you should deactivate the Transposh plugin!
Pros and Cons of Polylang+Lingotek compared to Transposh
PROS
- You have full control over translations, you can edit or change URLs, Titles, Meta tags, and everything else.
- Translate image alt tag and titles
- Set different menus for the languages
- Proper hreflang tags
CONS
- The free version of Polylang doesn’t allow keeping the same URL
- Additional pages are being created in your dashboard, increasing your database size.
- There are some settings you need to configure
- Elementor pages are messed up when being translated
My idea was to check my analytics pages report, filter the pages with the most traffic for every language code I use – de/es/fr/it/pt/pl and redirect them to the new translated version by Polylang.
How to automatically translate WordPress posts with Lingotek
- Install Polylang and go through the setup wizard. Choose the languages you want to translate your site to.
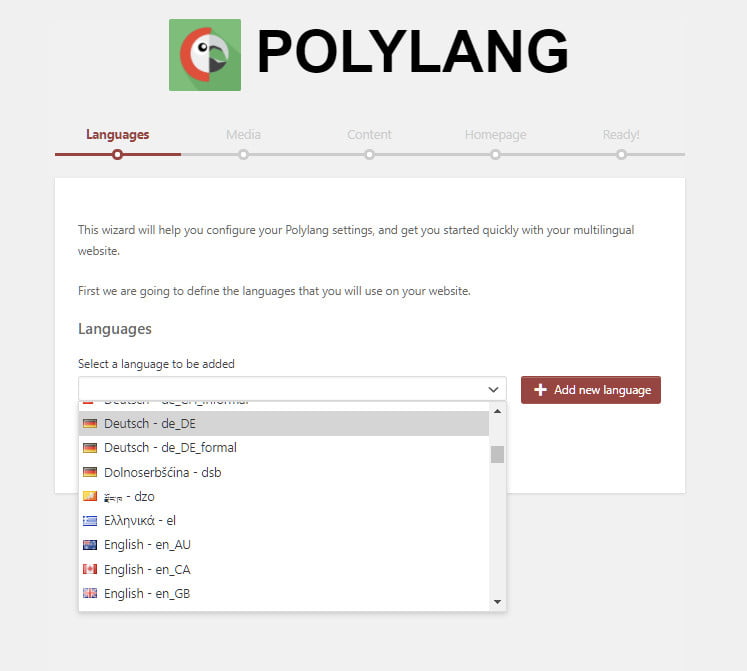
Add all the languages you want and click continue. Don’t forget to add your default language too.
2. Keep Media turned off, click continue and go to Content

Choose your default language. This is for posts without assigned language.
3. Choose translations for your homepage. If you use a page builder like Elementor, don’t translate your home page to avoid errors.
Finish the setup and return to the dashboard.
Later you can add more languages or change these settings from the “Languages” panel in your admin dashboard.
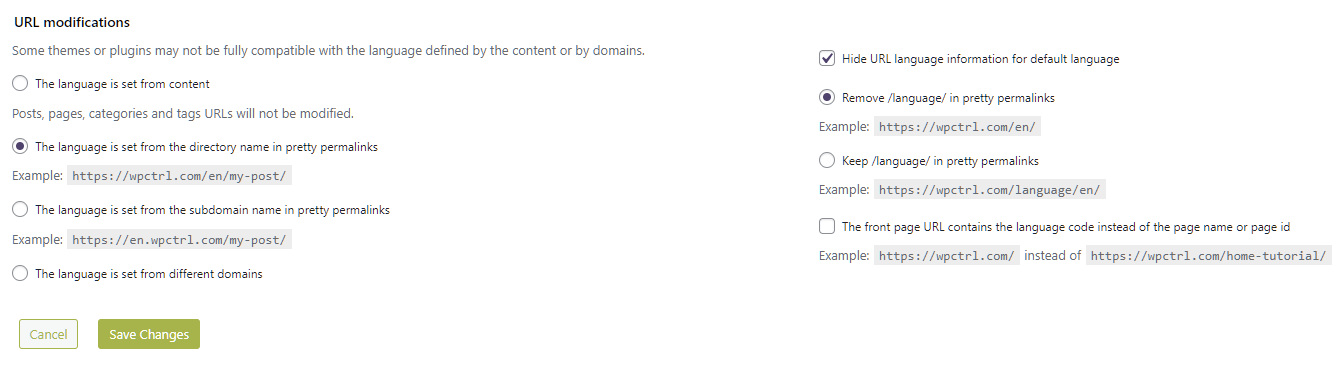
Setup Polylang
Go to Languages > Settings from your admin left-hand side menu. Select URL modifications and copy the following settings
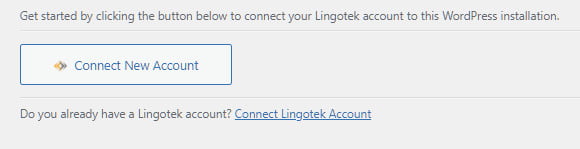
Install and Setup Lingotek for the automated translations
Again go to Plugins > Add new > in the search bar and type Lingotek. Install and activate the plugin.
- The first thing you’ll have to do is create your free account and connect it to your website.
You can set the specific content types you want to translate and choose either auto or manual. I suggest choosing Manual and translating only the posts and pages you want (i.e. the ones with traffic).
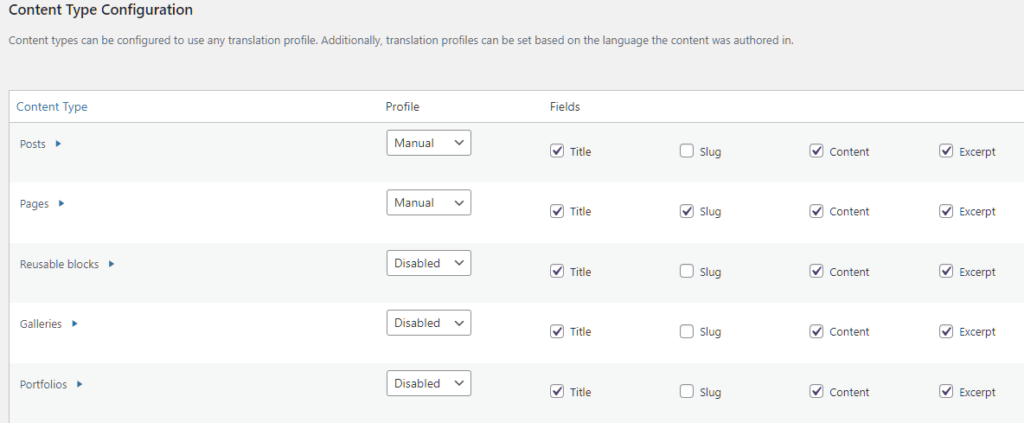
and disable the other content types.
This is the tricky part – if you select ‘Slug’ you’ll have your permalink translated. If you uncheck it, you will keep your original URL text, then a number will be added at the end, e.g /de/post-name-2, and the number will grow based on your language.
The option to keep the original slug on all translations of the post, and only change the language code is a PRO option and it’s only available if you purchase the paid version of Polylang.
The premium option is called ‘Share slugs’ and it’s automatically enabled if you get the pro version of Polylang.

If you choose to stick with the free version that will add one more step (to redirect the old Transposh URLs to the new translated ones ), but it’s not the end of the world.
Check the Most Popular Pages from your Analytics
I personally don’t want to have all my posts translated for now. I hope Transposh will get fixed so I will return to it one day.
So I checked my analytics and I translated only the pages that receive hits in the past 6 months.
Open your analytics and go to Behaviour > Site content > All pages
Select a time range of 6 months and in the search bar type the language code you used with Transposh – /de/es/it/fr etc. one after another.
See the pages with the most traffic and start with them. Go back to your WordPress and translate the posts, as I’ll show you below.
If you use RankMath go to the Redirections menu and redirect the URL from analytics to the new URL of the translated post with Polylang+Lingotek.
Again if you use the PRO version of Polylang you can keep the URLs exactly like they were in Transposh and skip the redirections.
Auto Translate Your Posts with Polylang+Lingotek
Go to your post list. Your posts should look like this:

If you have a total mess here disable some of the columns from the Screen options on the top of the page.
You can see our chosen languages and an arrow below our default language.
- Click the upload icon to upload your text to the translation engine
- Wait a few seconds till you see a checkmark under the default language flag
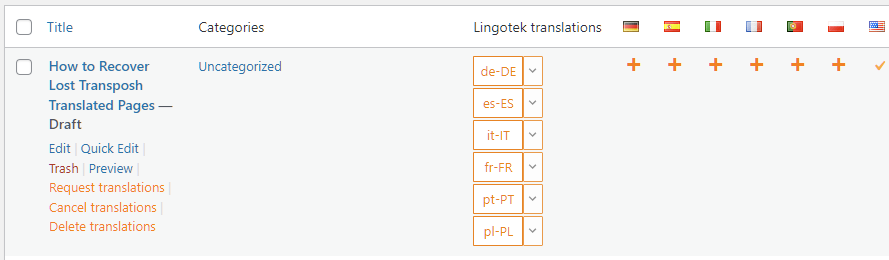
The language codes will appear in the ‘Lingotek translations’ column.
Click each language you want and this will request a translation for the chosen language. You can also click the ‘+’ icon, the action is the same.
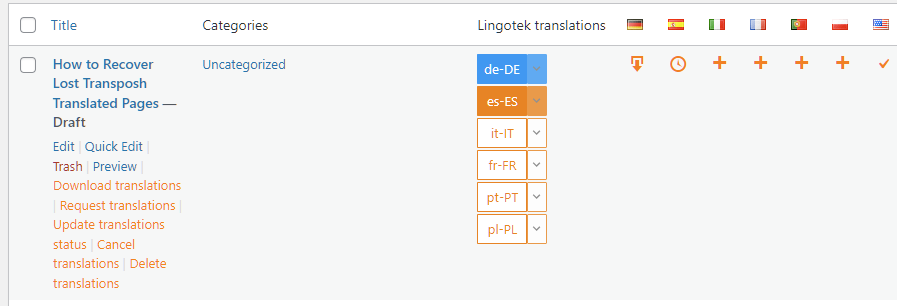
You can see on the screenshot above, the de-DE translation is ready to download and it’s in blue, while the es-ES is still in progress.
This process takes just a few seconds, you can refresh the page to see the current status, or just go with the blue ones, while the others are being downloaded in the background.
The final step is to download the ready translation by clicking on the blue language code (de-DE) or the download arrow below the flat (again it is absolutely the same).
Once the language is ready and published the button will turn green
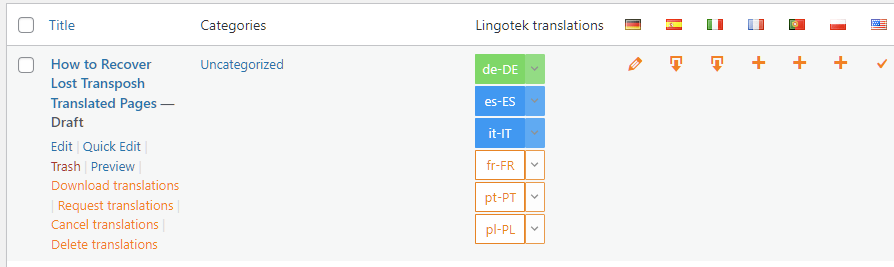
The green color means that the translation is ready and you can preview it by clicking the dropdown arrow and selecting ‘View translation.
Preview the URLS and make changes if needed.
Don’t forget that you now have a translated copy of your original posts.
You can switch between different languages or see them all at once from the top bar menu:

That’s it! Hope you got the idea. Translate the most popular posts to save your SERP positions and traffic.
I hope Transposh will get fixed soon, so we can continue to use it with no issues.
Disclosure: Some of the links on the page may contain a ref code (affiliate links), that tells the other side that we have sent you. If you liked what we suggest and you make a purchase, we may receive a commission.