


How do you speed up your website? There are many ways to improve the performance of your site. In this article, we’ll cover some of the easiest methods, that everyone could apply.
Page speed is a factor that can be measured precisely with a bunch of free tools online.
Furthermore, every visitor, even those who aren’t technically competent, can sense whether a website is loading fast or slow.
Today the vast majority of users spend their online time on popular social apps, reading news from big online media websites, or scrolling memes on some funny website.
The point is that these websites sit behind a million-dollar infrastructure, with their own powerful servers providing the best possible loading speed.
This is not the case with small businesses and personal websites hosted on cheap shared hosting. That doesn’t mean, by default, that all these websites are doomed to be slow from the start.

First, check your current speed metrics
There are a few very good tools for checking your site speed and possible problems.
- PageSpeed Insights – Google’s own tool, and the one that shows you the Core Web Vitals that actually count for SEO
- GTMetrix – the most comprehensive speed testing tool, and it reports Core Web Vitals too now
- Pingdom tools – you can choose different testing locations
- SpeedVitals – good for measuring TTFB from many different locations
Small housekeeping note: this guide used to link to web.dev/measure. Google has retired that tool and it now redirects to PageSpeed Insights, so that’s what I’ve listed above.
There are ways to speed up WordPress, even if you use a cheap shared hosting server.
In this article, I’ll go through some of the methods I’m using to speed up WpCtrl.com and achieve the numbers shown below (note I was using a $5 hosting plan when I ran this test).
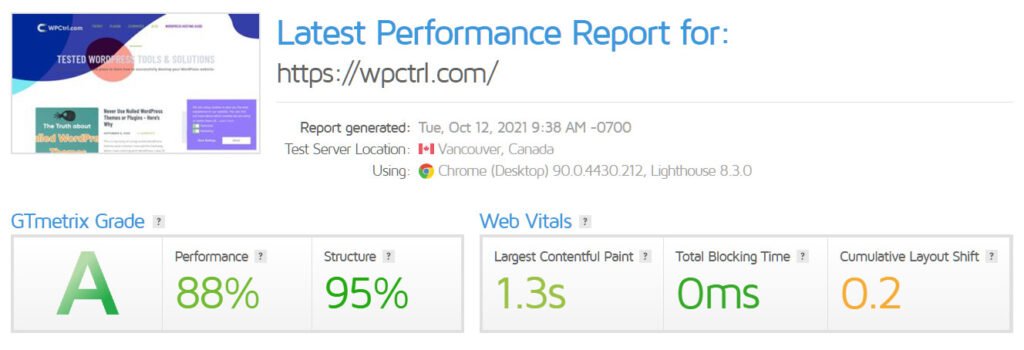
It’s not a perfect score, but I’m pretty satisfied with the numbers.
Before applying the methods I’m about to show you in this post, the same GTMetrix speed test was showing a fully loaded time of over 5 seconds and a page size of over 2MB.
Let’s jump right into the fixes that you could apply to your website and see the results immediately.
1. Get a Solid WordPress Hosting
I won’t go into much detail here. You can check my other article for a detailed review of the best hosting providers.
You can’t go wrong choosing any of the most popular companies, but I can suggest the following two:


What to look for
Plenty of things in the hosting industry now come as standard, so don’t fall for the so-called bonuses and premium features that companies present as something exceptional.
Things like a free domain, free SSL, free backups, SSD storage, free WordPress migration and cPanel are standard now. They should be included in your plan by default and are not something premium.
What’s actually worth paying attention to in a hosting plan today:
- The PHP version on offer. Running a current PHP release is one of the biggest free speed wins there is, and a host stuck on old versions tells you a lot about the rest of their stack.
- Server-level caching. LiteSpeed or NGINX caching handled by the host will always beat a plugin doing the same job in PHP.
- Where the server physically is. If your readers are in Europe and your server is in Texas, you’re paying for that distance on every single request.
- What the renewal price is. That $1.99 is an introductory rate almost everywhere. Check what year two costs before you commit.
Your hosting and your theme are the backbones of your website. This leads us to the second point.
2. Choose a Fast WordPress Theme
This might be unpleasant for those of you who already bought a theme and found out it’s not loading very fast no matter what you do to optimize it.
It’s not like you’re totally out of luck – you can still apply some optimizations to speed things up – but the end result will always be average.
Like Adrian Cojocariu notes in this post on how your theme affects SEO
Ugly Design Can Scare Users Away
Slow Speed Will Bore the Users to Death
Bad Structure Will Puzzle Search Engines
If you look at the top WordPress themes sold on ThemeForest, they all look stunning visually. But when you run a speed test you’ll hardly ever get a good score.
These themes usually come with a page builder (Elementor or WPBakery Page Builder) with tons of features, elements, and customizable options.
While all of these things are great in terms of design and possibilities, if your goal is to gain organic traffic and rank high on SERPs, you’d better reconsider your choice of theme.
My Theme Suggestions (For Fast Loading Site)
| Name | Speed Score | Live Demo |
|---|---|---|
| Kwik | ⚡⚡⚡⚡ ⚡ | Read Review |
| GeneratePress | ⚡⚡⚡⚡ ⚡ | View Now |
| Rein | ⚡⚡⚡⚡ | View Now |
| TopSEO | ⚡⚡⚡⚡ ⚡ | View Now |
| Gutentype | ⚡⚡⚡ | View Now |
And no matter how big and powerful you imagine your website to be, remember you will start with one blank page and zero content.
All those widgets, rich menus, interactive sections mean nothing if you don’t have corresponding content behind them.
So far one thing is for sure – content is what gets you ranked in the search results. The theme is just the ‘make-up’ of your content. It shouldn’t interfere with it in any way, only emphasize it.

WordPress themes have one key option, and you as a website owner should keep it in mind when you build your website.
Your homepage design. You can choose either to show your latest posts or a static page. And this has a lot to do with the speed of your homepage.
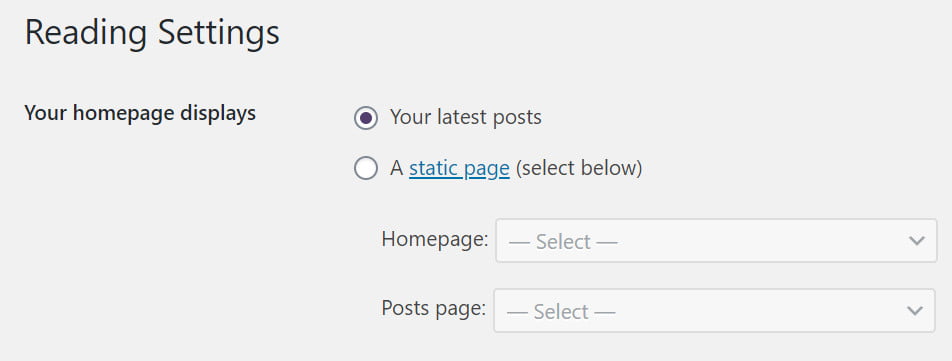
It’s located in the Settings > Reading menu and it defines how your homepage will look and function.
Let’s explain real quick what the difference between the two is.
Your latest posts, as the name suggests, will show your latest posts in a specific layout, with an excerpt and the post featured image. Some themes might have different layout options for you to choose from.
While the static page option gives you the freedom to design a custom page based on your needs and content. Usually this will require a page builder like Elementor or WPBakery, or you can use the built-in block editor.
Which one is Better and what Should I Choose?
It’s hard to say – both have pros and cons – but if you are new to blogging and WordPress, pick the latest posts option for now.
There are many successful blogs still using this approach (mine too).
In terms of speed it depends on what type of custom page you create, or how many posts you show with the latest posts option.
Usually the latest posts option performs better, because of the fewer requests and the smaller number of scripts being executed.
Now let’s hop to the plugins section. Here is what I use to speed up WordPress performance.
3. Use a WordPress Caching Plugin

Installing and activating a caching plugin is a few clicks of work and it’s usually the single biggest improvement you can make in an afternoon.
The best free caching plugins right now are:
| Plugin | Download |
|---|---|
| WP-Optimize | View Here |
| Autoptimize | View Here |
| WP Super Cache | View Here |
| WP Fastest Cache | View Here |
| W3 Total Cache | View Here |
| Hummingbird | View Here |
| LiteSpeed Cache | View Here |
Know Your Server Type!
The most popular server types that hosting providers use are LiteSpeed, NGINX and Apache.
The best caching happens on a server level, with tools provided by your host. For example, you should use LiteSpeed Cache only on LiteSpeed servers – on anything else it falls back to basic file caching and you lose most of what makes it good.
If you’re not sure what your server runs, open your browser’s developer tools, look at the Network tab and check the server response header on any request. Or just ask your host – it’s a one-line support question.
What I use on WPCtrl to Speed up WordPress
I’ve tried many caching plugins over time and the one that works best for me and delivers the best results is WP Fastest Cache.
It has the simplest configuration ever, and it does what it’s supposed to do.
Here is my configuration
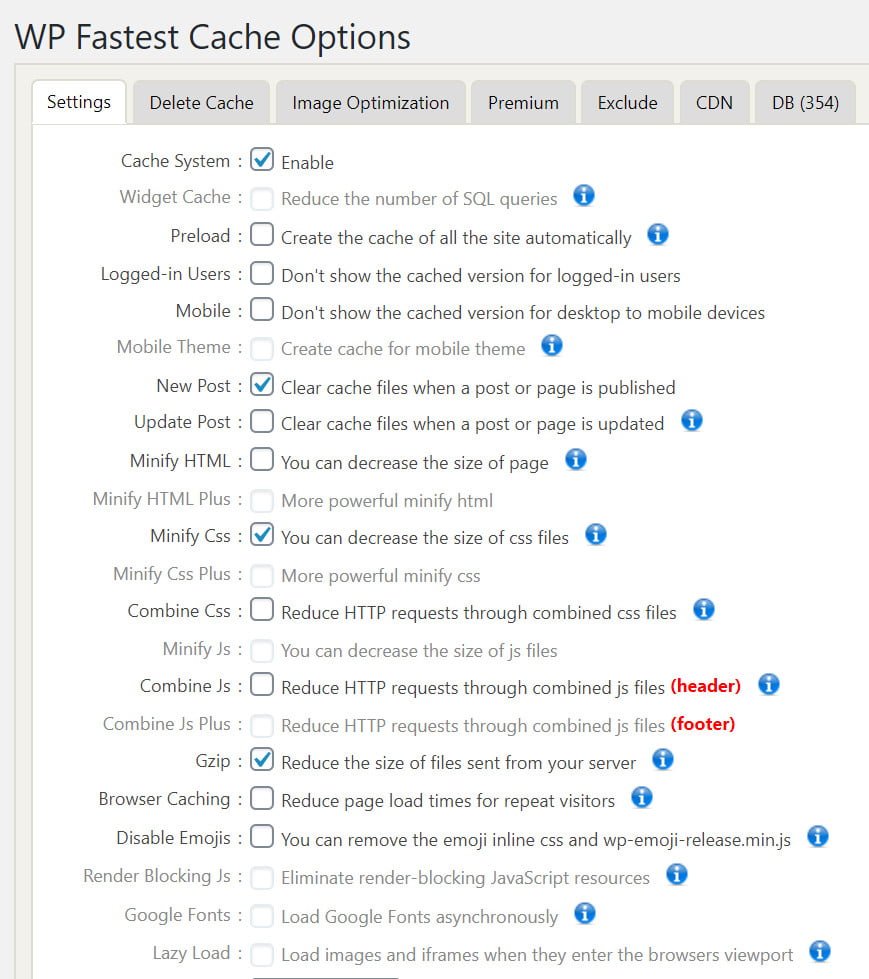
You have to be careful with all the minify and combine actions – they can break parts of your website and cause malfunctions! Turn them on one at a time and check your site after each one, rather than ticking everything and hoping.
If you use a SiteGround hosting plan, try their free Speed Optimizer plugin (you may remember it as SG Optimizer – same plugin, new name). It provides the best optimization possible on their servers.
Best Premium Caching Plugins
If you have the budget, there are some amazing paid caching plugins.
- WP Rocket
- WP-Optimize
- Hummingbird
Disable unnecessary scripts (where they are not needed) to Reduce HTTP Requests
One of the factors that slows down page speed is the number of requests.
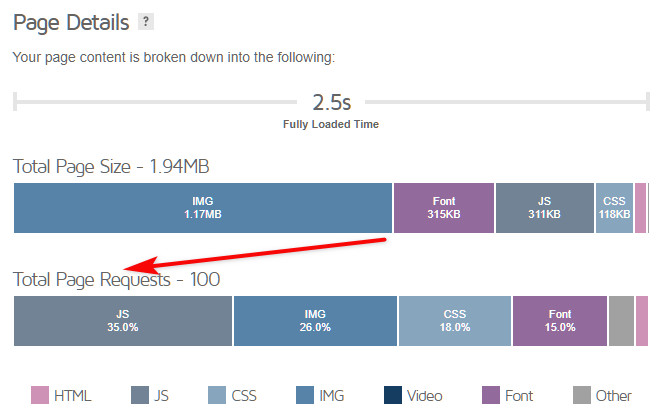
Requests accumulate with the number of plugins you add to your WordPress website, plus the images, CSS files and other scripts being executed on your page or post.
It’s a good idea to disable some scripts where they are not needed.
For example, you can have a homepage built with the Elementor page builder while your posts are written using the block editor – and yet the Elementor JS and CSS files still load on every post page.
You can reduce the number of requests and make your posts load faster by unloading these scripts where you don’t need them. And the good news is that there’s a free plugin for the job!
Download Asset CleanUp and install it.
Turn test mode on from the settings.
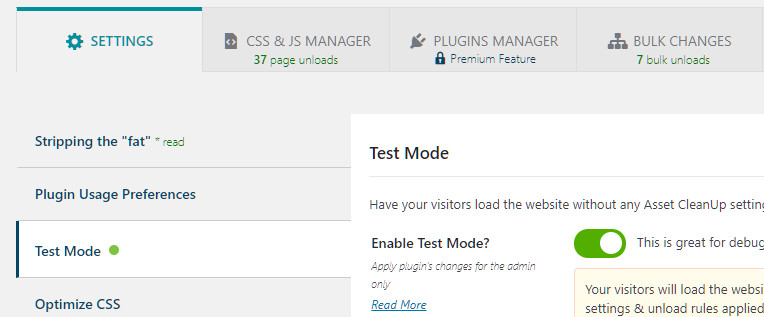
Test mode matters more than it sounds: it applies your unload rules only for logged-in admins, so if you break something you’re the only one who sees it. Leave it on until you’re happy with the result.
Next, go to CSS & JS Manager, where you have the option to choose Homepage, Posts, or Pages.
Start from the homepage. Here you can unload things like:
- Block library styles (unless your homepage is built with blocks)
- Any widgets you display only in your posts sidebar (social icons, subscribe forms, etc.)
For example, I use Genesis Blocks in my posts and I don’t need it on my homepage.
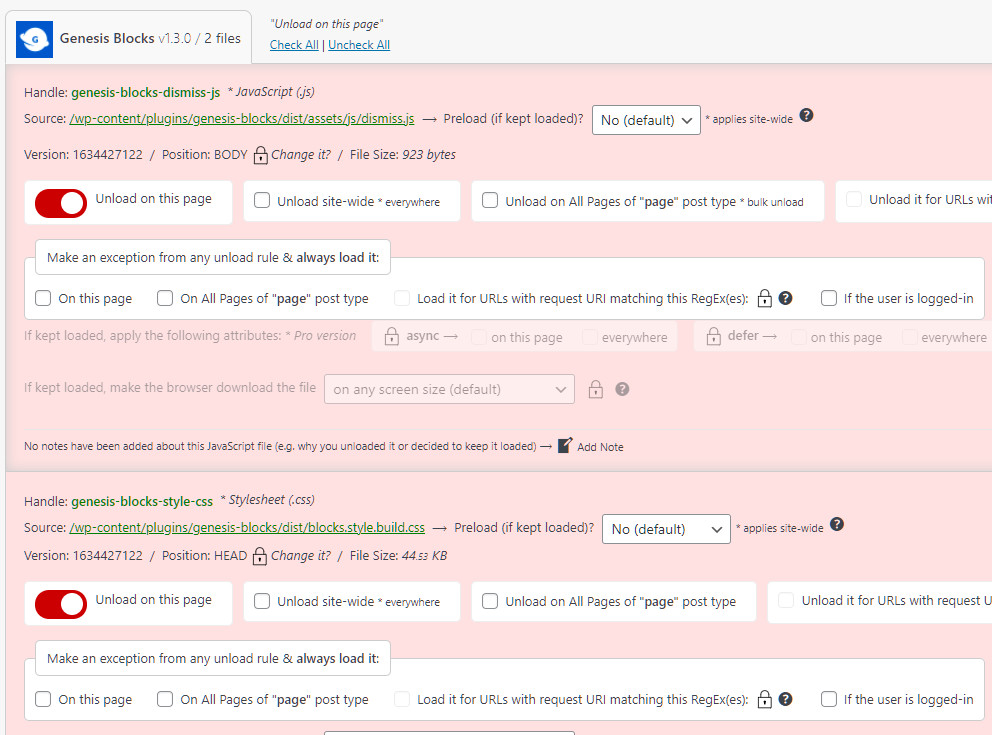
Select “Unload on this page” – this prevents the script from loading and slowing down your homepage.
I did the same with other plugins I only use on my post pages.
Update and check your homepage just in case.
Next Unload Scripts from your Posts
Do the same for your post pages – go to CSS & JS Manager.

Type something to select a post. It doesn’t really matter which post you choose, because we’re looking for scripts and plugins that aren’t used there at all.
Here you can select plugins you don’t use to create your posts. In most cases these include:
- Elementor, WPBakery, Beaver Builder, or any other page builder
- Any plugin you use only on your homepage
- Contact form plugins, if your form only lives on the contact page
Find what you don’t need and unload it on all posts.
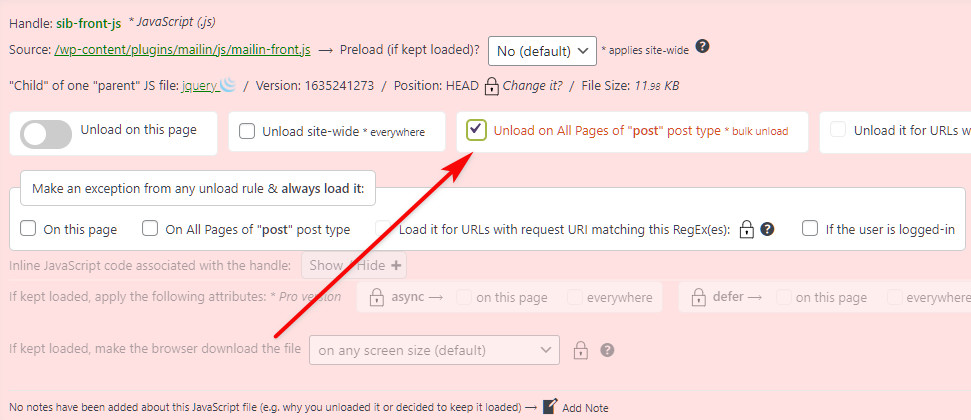
I hope you got the main point here. You don’t need to “carry” these scripts on all of your pages when you don’t use them.
You can always load the scripts again if you find any problems caused by this on your pages.
4. Use a CDN (Content Delivery Network)
Explained simply, a CDN stores a copy of your website’s content in multiple locations (servers) all over the planet, to minimize the distance between your visitor and your server.
If you have a worldwide audience – which will definitely happen if you write your content in English – you’d better include a CDN service in your game plan to speed up WordPress even more.
There is a free CDN called Cloudflare.
What I use and costs me just a few cents a month is a premium service called Bunny (formerly BunnyCDN).
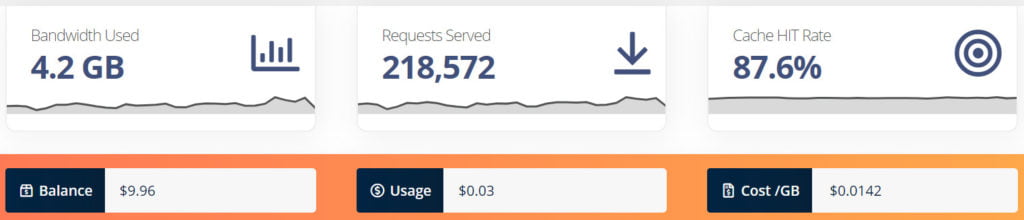
As you can see from the image above, I was paying $0.0142 per GB of data served. Rates vary by region and change over time, but the order of magnitude is the point: for a normal blog this is pocket change.
The whole process of setting up Bunny to work with your WordPress site is very easy.
Download the bunny.net free plugin and follow the simple instructions. You’ll set up your CDN in no time.
5. Don’t Go Bananas on Plugins
WordPress is popular for its wide repository of free plugins. There are also tons of premium choices on sites like CodeCanyon.
As a young website owner, you might find yourself thinking ‘for every problem, there’s a plugin’.
Plugins do a great job and there are essential plugins you must have.
But if your list of plugins grows beyond 20-30, you might reconsider deleting some of them to speed up your website.
To be fair to plugins, the count matters less than what they do. Ten lightweight plugins that add a filter here and there cost you almost nothing. One plugin that loads its own CSS framework and phones an external server on every page load costs you more than the other ten combined. If you want to know which is which, install Query Monitor and look at its “Queries by Component” and “HTTP API Calls” panels.
The Importance of Core Web Vitals for Your Website
Core Web Vitals are a specific set of metrics Google uses to measure real-world user experience, and they feed into ranking as part of Google’s page experience signals. There are exactly three of them, and it’s worth knowing what each one actually means, because “make the site faster” doesn’t fix all three.
- LCP (Largest Contentful Paint) – how long until the biggest visible thing on screen has loaded, usually your hero image or headline. Aim for 2.5 seconds or less. This is the one hosting, caching and image size affect most.
- INP (Interaction to Next Paint) – how quickly the page responds when someone taps or clicks. Aim for 200 milliseconds or less. This is a JavaScript problem, not a hosting problem: too many scripts fighting for the main thread make a page feel sticky even when it loaded fast.
- CLS (Cumulative Layout Shift) – how much the page jumps around while it loads. Aim for 0.1 or less. Usually caused by images without width and height attributes, ads, or web fonts swapping in late.
You can check all three in PageSpeed Insights. One thing that confuses everybody the first time: the report has two halves. The top section is field data – what real Chrome users actually experienced on your site over the past month, and it’s what counts for ranking. The bottom is lab data from a simulated load. Chasing a perfect lab score while your field data stays red is the classic way to waste a weekend.
If your scores aren’t good enough, the fixes are mostly things already covered in this guide: optimize your images, enable caching, cut unnecessary scripts, and put a CDN in front of it all. For CLS specifically, the quickest win is making sure every image has explicit width and height attributes so the browser reserves the space before the image arrives.
And don’t forget the obvious one: test on a phone. The majority of your visitors are on mobile, on a slower connection and a weaker processor than the laptop you’re reading this on. A site that feels instant on your desktop can be genuinely painful on a mid-range phone.
6. Beware of Your Image Sizes – Optimize and Compress your Media

Images, if not optimized, can add a lot to your page size.
If you upload 6MP, 5000 by 3000px photos into your posts directly as you downloaded them from a stock image website, you’ll hardly ever get a good page speed score.
Always resize your images according to your theme’s specific sizes. If your post has a wide hero featured image, use a size no greater than 1920px wide. For your in-post images, 990px wide is more than enough.
Create WebP Versions for your WordPress Images (JPG and PNG)
WebP is an image format that gives you a smaller file size, which makes your pages faster.
Since WordPress 5.8 the media library supports the WebP file format, so you can upload those files and use them in your posts just like JPEG and PNG. Newer WordPress versions also support AVIF, which compresses even better than WebP – worth knowing about, though WebP is still the safer default.
Why is WebP important for SEO?
The honest answer is that it isn’t important because Google made it – it’s important because the files are smaller. Smaller images mean a faster LCP, and LCP is a Core Web Vital. That’s the whole mechanism. Typical savings over an equivalent JPEG are around 25-35%, and on an image-heavy post that’s the difference between a page that feels quick and one that doesn’t.
You can either use a plugin to create WebP versions of your current JPG and PNG images, or convert them in advance with tools like ezgif.com or convertio.co.
WordPress plugins to generate WebP images
If you’re using a caching plugin, check whether it can already generate WebP images in its settings – that saves you installing another plugin.
For example, LiteSpeed Cache offers this for free.
Go to LiteSpeed Cache > Image Optimization.
In the image optimization settings tab, select:
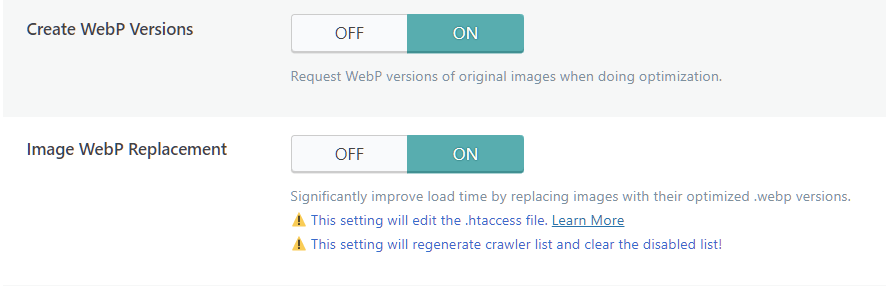
Next, go to the general tab and follow the links to create a free QUIC.cloud account, request a Domain Key and add it to the field.

EWWW Image Optimizer for WebP images
This is another popular free plugin for image optimization that offers WebP conversion, and it’s still one of the most installed options out there.
Download EWWW Image Optimizer, locate “WebP Conversion” in the settings and check the option.
What else?
👉 Use the online tool TinyJPG to compress your images even further (without noticeably worsening their quality).
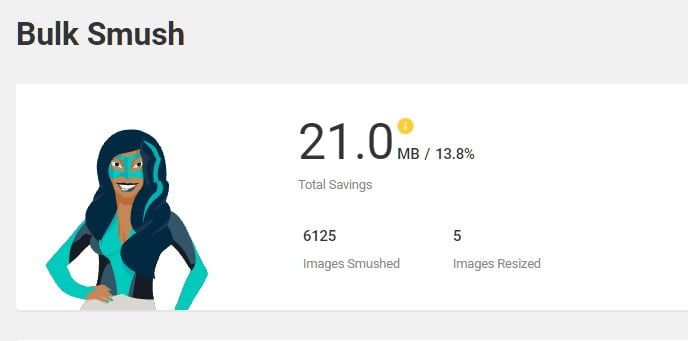
👉 Download a plugin like Smush to auto-optimize your images on upload.
Sometimes you can get a reduction of 80-90%!
One more free win while you’re here: make sure images below the fold are lazy loaded, and that your hero image is not. WordPress lazy loads images by default, which is right for almost everything – but lazy loading the one big image at the top of the page delays exactly the thing LCP measures.
7. Optimize Your WordPress Database
Don’t panic, I know this sounds a bit complicated but it’s not.
I use the free plugin WP-Optimize. This plugin will not only optimize your database but also provides image optimization and page caching.
The usual suspects it clears out are post revisions, trashed and spam comments, expired transients and orphaned metadata. On a site that’s been running for a few years, that can be a surprising share of your database.
Just make sure to always create a backup of your database before you run it, in case something goes wrong.
Bottom Line
Your website’s speed is not just the number of seconds it takes to load. Today, load time is a major factor in SEO and user experience. Make sure to take action toward optimizing your WordPress pages and content. You can get good results without investing a ton of money.
If you only do three things from this whole guide: get decent hosting, turn on caching, and stop uploading enormous images. That covers most of the gap between a slow site and a fast one – everything else here is refinement on top.
How to Speed up Your WordPress Website? Step-by-Step.
Step 1: Get a Good Hosting
If that’s still possible, and you haven’t already created your website on some crappy host, go for one of the recommended hosting companies.
Step 2: Install a WordPress Caching Plugin
For non-tech savvies, I recommend WP Fastest Cache. The caching plugin can speed up your website with just a few clicks.
Step 3: Don’t install too many Plugins
More plugins mean more code and requests, and more code and requests mean a slower page load time. Keep it clean and use only well-known, good-rated plugins.
Step 4: Watch your file size
If your infobox has a placeholder for a 200×100 image, there is absolutely no need to upload a high-quality (1920×1080) image. Just open any image editor (Paint, photopea, or Photoshop) and resize it to the needed size.
Other than that every time you upload a big image, try compressing it with free tools like TinyJPG or Compressjpeg.
Disclosure: Some of the links on the page may contain a ref code (affiliate links), that tells the other side that we have sent you. If you liked what we suggest and you make a purchase, we may receive a commission.
