How do you speed up your website? There are many ways to improve the performance of your site. In this article, we’ll cover some of the easiest methods, that everyone could apply.
Page speed is a factor that can be measured precisely with a bunch of free tools online.
Furthermore, every visitor, even those not technically competent, could sense rather a website is loading fast or slow.
Today the vast majority of users spend their online time on popular social apps, reading news from big online media websites, or scrolling memes on some funny website.
The point is that these websites are behind a million-dollar infrastructure, with their own powerful servers providing the best possible loading speed.
This is not the case with small businesses and personal websites that are hosted on cheap shared hosting. This doesn’t mean, by default, that all these websites are doomed to be slow from the start.

First, check your current speed metrics
There are a few very good tools for checking your site speed and possible problems.
- GTMetrix – the most comprehensive speed testing tool
- Pingdom tools – you can choose different testing locations
- Web.dev – Good for Google Web Vitals testing
- SpeedVitals – good for measuring TTFB from 35 different locations.
There are ways to speed up WordPress, even if you use a cheap shared hosting server.
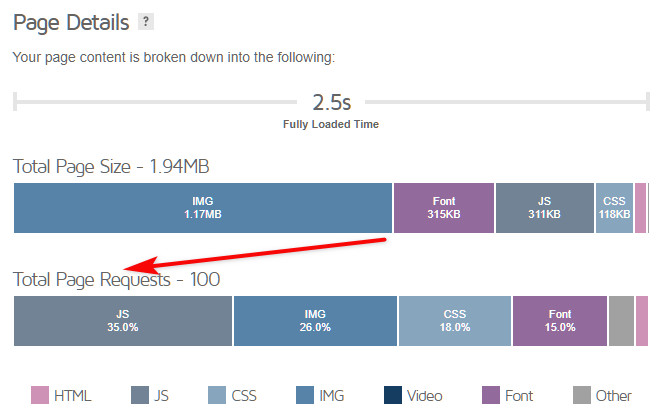
In this article, I’ll go through some of the methods I’m using to speed up WpCtrl.com and achieve the numbers shown below (note I’m using a $5 hosting plan as I’m writing this).

It’s not a perfect score, but I’m pretty satisfied with the numbers.
Before applying the methods I’m about to show you in this post, the same GTMetrix speed test was showing a fully loaded time of over 5 seconds and a page size of over 2MB.
Let’s jump right into the fixes that you could apply to your website and see the results immediately.
1. Get a Solid WordPress Hosting
I won’t go into much detail here. You can check my other article for a detailed review of the best hosting providers.
You can’t go wrong by choosing any of the most of the popular companies, but I can suggest the following two:
What to look for
It’s 2020 and some things in the hosting industry now comes standard, so don’t fall for the so called bonuses and premium features that companies bring as something exceptional.Things like – free domain, free SSL, free back-ups, SSD, free WordPress migration, cPanel are standard now, and should be included in your plan by default and are not something premium.Your hosting and your theme are the backbones of your website. This is leading us to the second point.
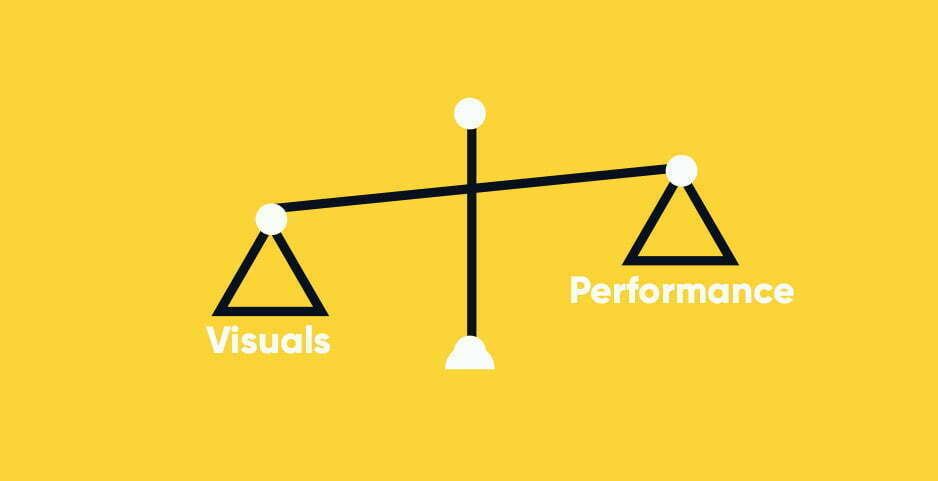
2. Choose a Fast WordPress Theme
This might be unpleasant for those of you, who already bought a theme, and found out it’s not loading very fast no matter what you do to optimize it.
It’s not like you are totally screwed up, you can still apply some optimizations to speed up WordPress and your site, but the end result will always be average.
Like Adrian Cojocariu notes in this post on how your theme affects SEO
Ugly Design Can Scare Users Away
Slow Speed Will Bore the Users to Death
Bad Structure Will Puzzle Search Engines
IF you look at the top WordPress themes sold on ThemeForest they all look stunning visually. But when you run a speed test you’ll hardly get a good score.
These themes usually come with a page builder (Elementor or WPBakery Page Builder) with tons of features, elements, and customizable options.
While all of these things are great in terms of design and possibilities, if your goal is to gain organic traffic and rank high on SERPs, you better reconsider your choice of theme.
My Theme Suggestions (For Fast Loading Site)
| Name | Speed Score | Live Demo |
|---|---|---|
| Kwik | ⚡⚡⚡⚡ ⚡ | Read Review |
| GeneratePress | ⚡⚡⚡⚡ ⚡ | View Now |
| Rein | ⚡⚡⚡⚡ | View Now |
| TopSEO | ⚡⚡⚡⚡ ⚡ | View Now |
| Gutentype | ⚡⚡⚡ | View Now |
And no matter how big and powerful you imagine your website to be, remember you will start with one blank page and zero content.
All those widgets, rich menus, interactive sections mean nothing if you don’t have corresponding content behind them.
So far one thing is for sure – content is what gets you ranked in the search results, the theme is just the ‘make-up’ of your content. It shouldn’t interfere with it in any way but emphasizes it.
WordPress themes have one key option, and you as a website owner should have this in mind when you build your website.
Your homepage design. You can choose either to show your latest posts or a static page. And this has a lot to do with the speed of your homepage.
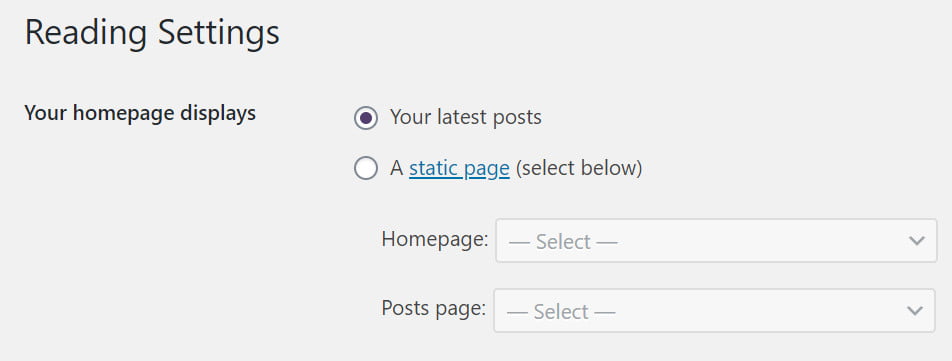
It’s located in the Settings > Reading menu and it defines how your homepage will look and function.
Let’s explain real quick what’s the difference between the two.
Your latest posts as its name suggest will show your latest posts in a specific layout, with an excerpt and the post featured image. Some themes might have different layout options for you to choose from.
While the static page option gives you the freedom to design a custom page, based on your needs and content. Usually, this will require a page builder like Elementor or WpBakery, or you can use the in-house Gutenberg editor.
Which one is Better and what Should I Choose?
It’s hard to say, both have pros and cons, but if you are new to blogging and WordPress, pick the latest posts option for now.
There are many successful blogs that are still using this approach (mine too).
In terms of speed, again it depends, on what type of custom page you will create, or how many posts you will show with the latest posts option.
Usually, the latest posts should perform better in terms of speed, because of the fewer request and the number of scripts being executed.
Now let’s hop to the plugins section. Here is what I use to speed up WordPress performance.
3. Use a WordPress Caching Plugin

With just a few clicks, from the installation to activating your Caching Plugin you reduce the load time of your site by more than 50%!
The best free caching plugins right now are:
| Plugin | Download |
|---|---|
| WP-Optimize | View Here |
| Autoptimize | View Here |
| WP Super Cache | View Here |
| WP Fastest Cache | View Here |
| W3 Total Cache | View Here |
| Hummingbird | View Here |
| LiteSpeed Cache | View Here |
Know Your Server Type!
The most popular server types, that most hosting providers use are – LiteSpeed, Nginx, and Apache.
The best caching happens on a server level, with tools provided by your host. For example, you should use LiteSpeed Cache, only on LiteSpeed servers.
What I use on WPCtrl to Speed up WordPress
I’ve tried many caching plugins over time and the one that works best for me and delivers the best results is WP Fastest Cache.
It has the most simple configuration ever, and it does what it is supposed to do.
Here is my configuration
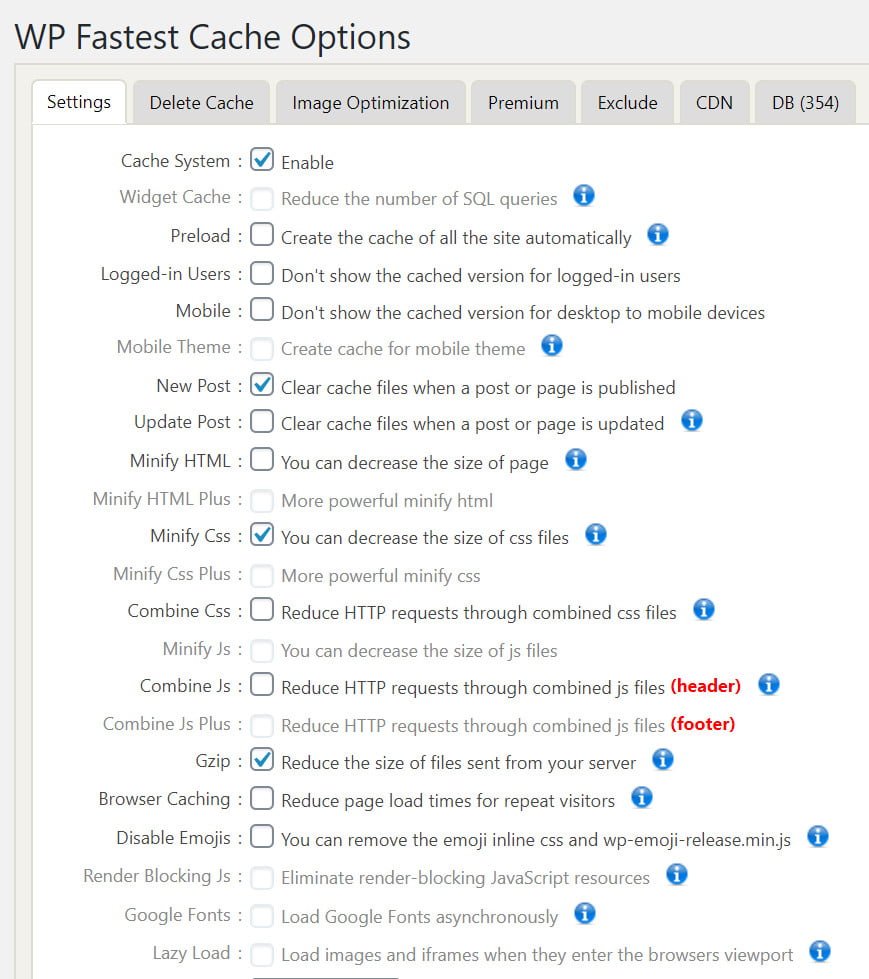
You have to be careful with all the minify and combine actions, they can break parts of your website and cause malfunctions!
If you use a SiteGround hosting plan, try their SG Optimizer Free plugin. It provides the best optimization possible.
Best Premium Caching Plugins
If you have the budget, there are some amazing paid caching plugins.
- WP Rocket
- WP-Optimize
- Hummingbird
Disable unnecessary scripts (where they are not needed) to Reduce HTTP Requests
One of the factors that slow down page speed is the number of requests.
Requests are being accumulated with the number of plugins you add to your WordPress website, the images, CSS files, and other scripts being executed on your page or post.\
It’s a good idea to disable some scripts, where they are not needed.
For example, you can have a home page built with Elementor page builder, but your posts are written using the classic visual editor or Gutenberg blocks, but the Elementor JS files are still executed on your post pages.
You can reduce the number of requests and make your posts load faster when you unload these scripts where you don’t need them. And the good news is, that there is a free plugin for this job!
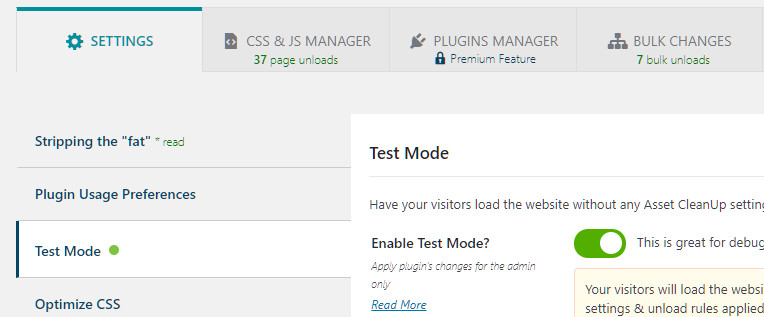
Download Asset CleanUp and install it.
Turn the test mode on from the settings.
Next, go to CSS & JS Manager, you have the option to choose Homepage, Posts, or Pages.
Start from the homepage. Here you can unload all plugins like:
- Blocks (unless you home page is build by Gutenberg blocks)
- Any widgets you display only in your posts sidebar (Social icons, Subscribe, etc.)
For example, I use Genesis blocks in my posts and I don’t need it for my homepage.
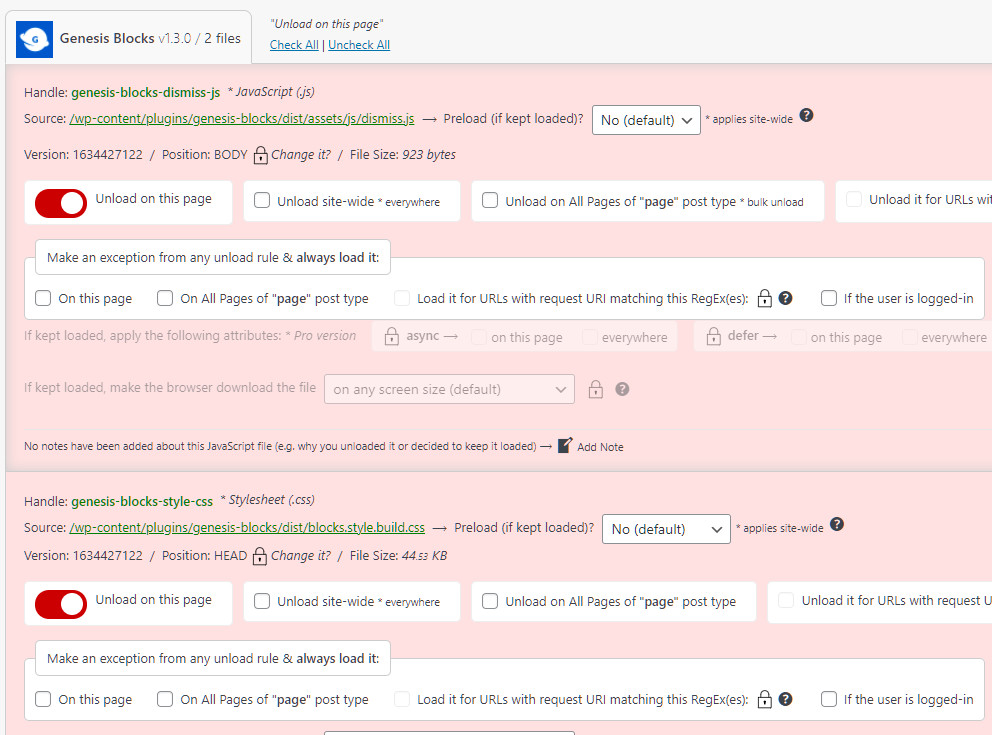
Select ”Unload on this page” – this will prevent the script from loading and slowing your Homepage.
I also did this with other plugins I only use only on my post pages.
Update and check your home page just in case.
Next Unload Scripts from your Posts
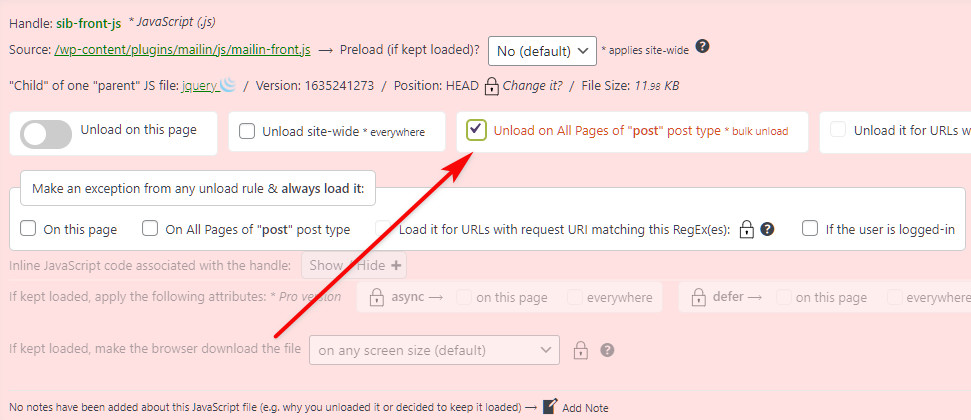
Do the same for your post pages, go to CSS & JS Manager.

Type something to select a post, it doesn’t really matter what post you are choosing, because we will look for scripts and plugins which are not used there.
Here you can select plugins that you are not using to create your posts, in most cases these would include:
- Elementor, WPBakery, Beaver builder, or any other page builder.
- Any plugin you use only on your homepage
Find what you don’t need and unload it on all posts
I hope you got the main point here. You don’t need to “carry” these scripts on all of your pages when you don’t use them.
You can always load the scripts again if you find any problems caused by this on your pages.
4. Use a CDN (Content Delivery Network)
Explained simply, the CDN stores a copy of your website’s content in multiple locations (servers) all over the planet, to minimize the distance between your visitor and your server.
If you have a worldwide audience, which will definitely happen if you write your content in English, you better include a CDN service in your game plan to speed up WordPress even more.
There is a free CDN called Cloudflare.
What I use and costs me just a few cents a month is a premium service called BunnyCDN.
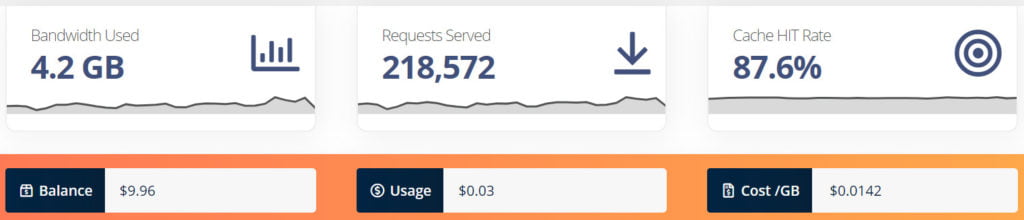
As you can see from the image above I pay $0.0142 for a GB of data served.
The whole process of setting up BunnyCDN to work with your WordPress сите is very easy.
Download the BunnyCDN free plugin and follow the simple instructions. You’ll set your CDN in no time.
5. Don’t Go Bananas on Plugins
WordPress is popular with its wide repository of free plugins. There are also tons of premium choices, on sites like CodeCanyon.
As a young website owner, you might find yourself in the commonplace of thinking ‘for every problem, there’s a plugin’.
Plugins do a great job and there are essential plugins that you must have.
But if your list of plugins grows to a number of more than 20-30 you might reconsider deleting some of them to speed up your website.
The Importance of Core Web Vitals for Your Website
Core web vital is a set of metrics that measure the performance of your site. They provide valuable information about your site in terms of speed, security, and reliability.
- Page Speed – This metric measures how quickly a page loads. Pages with slow load times may cause visitors to leave before they’ve even had a chance to read what you have to say.
You can use Google’s PageSpeed Insights tool to check your site’s current score. If your score isn’t good enough, there are several things you can do to improve it.
One of the easiest ways to make sure your site loads fast is to optimize images. Images take up a lot of space on a page, so reducing them will reduce the size of your page and therefore speed up loading times. Another thing you can do is compress your HTML code.
Compressing your HTML reduces the number of bytes sent across the Internet, which means less data needs to be transferred. Finally, you should consider using a CDN (content delivery network) to cache static files such as JavaScript, CSS, and image files.
These files are often downloaded multiple times during a user session, which slows down the process. Using a CDN allows these files to be cached at one location, making it much faster for users to access them.
- Mobile Friendliness – This metric measures whether or not your website is mobile-friendly. If it isn’t, then your potential audience will be limited to those who use smartphones or tablets.
There are two main reasons why websites aren’t mobile-friendly. First, some developers believe that creating a mobile version of a website would require too much work.
Second, some companies think that having a mobile version of their website would cannibalize sales because customers would prefer to buy products online rather than visit a brick-and-mortar store.
However, recent studies show that people are more likely to purchase items when they’re able to browse through an item before buying it. In fact, according to a study by eMarketer, nearly half of smartphone owners say they shop online more frequently than they did five years ago.
So, if you want to reach a larger audience, you need to ensure that your website is mobile-friendly and optimized for smartphones and tablets.
6. Beware of Your Image Sizes – Optimize and Compress your Media

Images, of not optimized can add a lot to your page size.
If you upload 6MP, 5000 by 3000px photos in your posts, directly as you downloaded them from a stock images website you will hardly ever get a good page speed score.
Always resize your images according to your theme’s specific sizes. If your post would have a wide hero featured image, use a size no greater than 1920px wide. For your in-post images, 990px wide is more than enough.
Create WebP Versions for your WordPress Images (JPG and PNG)
WebP is an image format that provides a smaller file size, thus making your pages faster.
Luckily since WordPress 5.8, the media library supports the WepB file format. You can upload such files and use them on your posts as jpeg and png.
Why is WebP important for SEO?
In short – it’s created by Google, so Google loves WebP images. The other benefit is the smaller sizes of the WebP images, which would add some milliseconds to your page’s load time.
You can either use a plugin to create WebP versions of your current jpg and png images or convert your images in advance in tools like ezgif.com or convertio.io.
WordPress Plugins to generate WebP images
If you are using a premium caching plugin you can search if there is an option to generate WebP images in the settings (this will save you the need to install additional plugins).
For example, LiteSpeed Cache offers this for free.
Go to LiteSpeed Cache > Image Optimization
In the image optimization settings tab, select
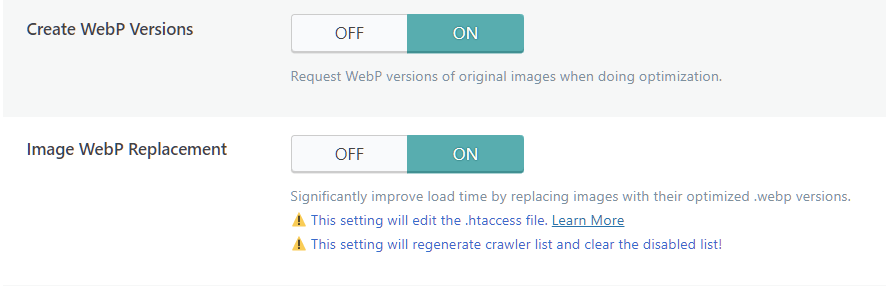
Next, go to the general tab and follow the links to create a free QUIC.cloud account and request a Domain Key and add it to the field

EWWW Image Optimizer for WebP images
This is another popular free plugin for image optimization, that offers WebP conversion.
Download EWWW Image Optimizer, locate the “WebP Conversion” in the settings and check the option.
What Else?
👉 Use the online tool TinyJPG to compress your images even more (without worsening their quality).
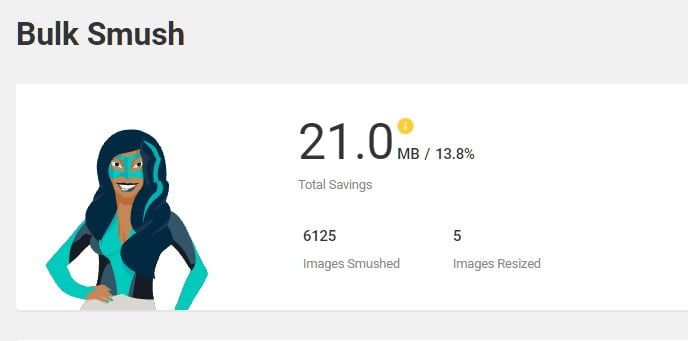
👉 Download a plugin like Smush to auto-optimize your images on upload.
Sometimes you can get a reduction of 80-90%!
7. Optimize Your WordPress Database
Don’t panic, I know this sounds a bit complicated but it’s not.
I use the free plugin WP-Optmize. This plugin will not only optimize your database but will also provide image optimization and page cache.
Just make sure to always create a backup of your database in case something goes wrong.
Bottom Line
Your website speed is not just the number of seconds it takes to load. Today load time is a major factor in SEO and user experience. Make sure to take action toward optimizing your WordPress pages and content. You can get good results without investing a ton of money.
How to Speed up Your WordPress Website? Step-by-Step.
Step 1: Get a Good Hosting
If that’s still possible, and you haven’t already created your website on some crapy host, go for some of the recommended hosting companies.
Step 2: Install a WordPress Caching Plugin
For non-tech savvies, I recommend WP Fastest Cache. The caching plugin can speed up your website with just a few clicks.
Step 3: Don’t install too many Plugins
More plugins mean more code and requests, and more code and requests mean a slower page load time. Keep it clean and use only well-known, good-rated plugins.
Step 4: Watch your file size
If your infobox has a placeholder for a 200×100 image, there is absolutely no need to upload a high-quality (1920×1080) image. Just open any image editor (Paint, photopea, or Photoshop) and resize it to the needed size.
Other than that every time you upload a big image, try compressing it with free tools like TinyJPG or Compressjpeg.
Disclosure: Some of the links on the page may contain a ref code (affiliate links), that tells the other side that we have sent you. If you liked what we suggest and you make a purchase, we may receive a commission.